tekball

home of latest tips and tricks for computer,mobie and internet.free sofwares,games,books,tutorials,downloads and much more....

SEARCH TEKBALL

Loading
Showing posts with label WINDOWS. Show all posts

Wednesday, April 6, 2011

NOTICE FOR DEAR USERS :)

THE BLOG WWW.TEKBALL.BLOGSPOT.COM HAS BEEN SHIFTED TO www.techmatics.blogspot.com.
we hope you will support the change.
THANK YOU !

Friday, March 18, 2011

15 Activation Keys for Windows 7 Pre-Beta


Windows 7 pre-beta release has been leaked all over on the internet, which is free to Download in Many torrent Forums. But without a valid product key to activate the Windows 7, the system can only run for 30 days maximum. So to Activate it you need Windows 7 Pre-Beta Activation Product Keys.
So am Here posting 15 Activation Keys for Windows 7 Pre-Beta. Each product key can be used for unlimited number of client system activation.
Here’s a list of 15 Multiple Activation Product Keys (MAK)
J7PYM-6X6FJ-QRKYT-TW4KF-BY7H9
D67PP-QBKVV-6FWDJ-4K2XB-D4684
HQDKC-F3P6D-C9YYM-HRB89-QDBB7
76DX2-7YMCQ-K2WCP-672K2-BK44W
2RG93-6XVFJ-RKHQ7-D2RTT-3FMQT
TT63R-8JGWP-WWT97-R6WQC-4CVWY
YQJX6-D6TRM-VWBM7-PHDJK-YPXJH
Q7J7F-GQHBT-Q42RQ-2F8XV-2WKKM
KH4X7-JY8G7-RCD7G-BYDJW-YTPXH
WYBJ8-8QVP3-24R82-VV2VP-72Q9W
9DP2R-W78GJ-GJBKW-CKR46-H3WYT
CXB7F-WWCM4-BP9V3-2YH43-RK8Y6
W9BYV-K2TB8-4YDJT-QBQWP-KFDHB
WGDJW-B8DYC-WVKX4-6MKF4-B8PK8
2PHXF-9PBDW-D3WWY-CPDKD-XG87V
Windows 7 early pioneers (or genie pigs) can use one of the key to activate Windows 7 online or by phone activation.

18 Great Google Search Tricks

Google is one the best and top Search Engine and if you use Google only to search for words and phrases, you’re doing it wrong. There are so many thing you can done with Google Search. The service is loaded with many advanced tricks that you can enable from that unassuming search box. In this article we review 18 awesome google search Tips and tricks that will improve the quality of your online life.


1. Find the current time elsewhere: Don’t bother trying to convert the time from your local setting to a distant city. Just type time city , as in time Beijing, to see the current time in that location. Yeah, it’s too late to call your buddy there.
2. Search within a domain: Google’s great search engine might be better (or simply more convenient) than the search box on a particular site. To limit results to a single site, type search term site:domain name. Eaxmple site:technobuzz.net
3. Search for a file type: You can look up results that match a specific file type. This trick is great for special searches, such as tracking down a product manual or video file. Try search term filetype:three-letter type . For example, I entered Zoom H2 manual filetype:pdf to find the manual for that Zoom recording device.
4. Weather as reported by Google SearchGet the weather: To see the weather for many U.S. and worldwide cities, type “weather” followed by the city and state, U.S. zip code, or city and country.
5. Calculate and convert: To use Google’s built-in calculator function, simply enter the calculation you’d like done into the search box. Try typing math problems, such as 89*22/(16), or conversions, like 100 yards = ? meters. Google will do the rest.
6. Track stocks: To see current market data for a given company or fund, type the ticker symbol into the search box. On the results page, you can click the link to see more data from Google Finance. You can enter a stock’s trading abbreviation, such as GOOG, and the first result will show the stock’s latest price, a graph of the day, and other financial details.
7. Get movie times: On the Web you have a myriad of choices to look up show times, but Google’s simplicity is tough to beat. Just type movies: city or zip code , as in movies 68501. Click the More movies link to get more-specific listings.
8. Track packages: Have a FedEx, UPS, or USPS tracking number? Just enter it in the Google search box for the latest package status.
9. Sports Scores: To see scores and schedules for sports teams type the team name or league name into the search box. This is enabled for many leagues including the National Basketball Association, National Football League, National Hockey League, and Major League Baseball.
10. Book Search: If you’re looking for results from Google Book Search, you can enter the name of the author or book title into the search box and we’ll return any book content we have as part of your normal web results. You can click through on the record to view more detailed info about that author or title.
11. Earthquakes: To see information about recent earthquakes in a specific area type “earthquake” followed by the city and state or U.S. zip code. For recent earthquake activity around the world simply type “earthquake” in the search box.
12. Unit Conversion: You can use Google to convert between many different units of measurement of height, weight, and volume among many others. Just enter your desired conversion into the search box and we’ll do the rest.
13. Synonym Search: If you want to search not only for your search term but also for its synonyms, place the tilde sign (~) immediately in front of your search term.
14. Dictionary Definitions: To see a definition for a word or phrase, simply type the word “define” then a space, then the word(s) you want defined. To see a list of different definitions from various online sources, you can type “define:” followed by a word or phrase. Note that the results will define the entire phrase.
15. Spell Checker: Google’s spell checking software automatically checks whether your query uses the most common spelling of a given word. If it thinks you’re likely to generate better results with an alternative spelling, it will ask “Did you mean: (more common spelling)?”. Click the suggested spelling to launch a Google search for that term.
16. Airline Travel Info: To see flight status for arriving and departing U.S. flights, type in the name of the airline and the flight number into the search box. You can also see delays at a specific airport by typing in the name of the city or three-letter airport code followed by the word “airport”. Examples:- american airlines 18, Houston airport
17. Currency Conversion: To use our built-in currency converter, simply enter the conversion you’d like done into the Google search box and we’ll provide your answer directly on the results page. Example: 150 GBP in USD
18. Phone Listing: Let’s say someone calls you on your mobile number and you don’t know how it is. If all you have is a phone number, you can look it up on Google using the phonebook feature. Example: phonebook:617-555-1212 (note: the provided number does not work – you’ll have to use a real number to get any results).

Friday, March 4, 2011

Picture Perfect Follow a few simple rules of photography to create stunning pictures.


As clichéd as it may sound, the
truth is that a picture speaks a
thousand words, and a well-shot
picture always stands out. When you
enter a living room, it’s common to see
family portraits and vacation memories
When shooting outdoors, the most
important aspect to look at is lighting.
With the right amount of lighting, you
can achieve just about the same output
as you would using in-house or studio
lighting. However, there are certain
factors to consider when shooting
outdoors.
                                                                                   
Keeping your subject a little off-center adds more depth to the overall
picture.
Camera settings and techniquesFirst and foremost, avoid shooting
on the walls or show cases. Now, it can
be embarrassing to have washed out or
grainy pictures in those photo frames.
In this workshop, we discuss the various
aspects of shooting the perfect picture in
dif  erent scenarios and enhancing them
at noon or when the sun is directly
overhead. Apart from the lighting
conditions, you will also need to look
into your camera settings. If you have
a normal point-and-shoot, you should
consider having settings like aperture,
shutter speed and the manual mode.
However, not all cameras come with a manual mode. In such cases, just the aperture and shutter speed controls willsui   ce. We have taken both indoor and outdoor shoots into consideration for the
following tutorial as there are no fi  xed settings that apply to all situations.
STEP 1: RULE OF
THIRDS
A very common mistake that most of us make when shooting portraits is to place the subject right at the center. While it might seem like the most natural way of capturing portraits, it defi  nitely has the makings of a very dull and unimaginative picture. The basis of this after they’ve been shot. Right from the
initial steps of shooting, using proper cameras and equipment, to the post processing and printing of images, we’ll give you brief step-by-step guides on the various crucial aspectsrule states that if you were to divide a
rectangular frame with two equidistant vertical and horizontal lines into nine equal parts, then the point where the lines meet is where the subject should be placed. This rule is applied to prevent positioning the subject at the center. To make things simpler, you can enable the ‘grid’ view option that most cameras come with.
STEP 2: APERTURE AND SHUTTER
SPEED
Both aperture and shutter speed are inversely proportional to one another, which means that if you increase the aperture range, the shutter speed will automatically decrease, and vice versa. However, this only happens when you choose to shoot either in aperture priority mode or shutter speed mode. The shutter priority mode is best used when you're shooting either in low light or whenthe subject that is being shot requires
a really high shutter speed, like when you're capturing fast moving objects. If you want greater control over the depthof fi eld, then the aperture priority modeshould help achieve this. Decrease thenumber of f-stops to get a better depthof fi  eld. This is best used when you only need your product or subject to be your
point of focus.
STEP 3: ISO
The selection of ISO settings plays an important role in photography and how
your images turn out. The lower the camera's ISO levels, the fi  ner will be
the overall image quality. However, the ISO levels all depend on the lighting
conditions. Better the lighting conditions, smaller will be the ISO levels. However,
we recommend not going beyond ISO 400 when using digital cameras,
because anything over this value will produce visible noise. The same cannot
be said when shooting with an SLR, because SLRs come with a larger sensor
size along with better post-processing capabilities. The best way to overcome
the noise issues with digital cameras would be to set it to manual mode (if
your camera supports this) or switch to either shutter/aperture priority while not 
going above ISO 400. It is recommended that you make use of a tripod, especially
when you are shooting under low light conditions.
STEP 4: FLASH INTENSITY
Manually adjusting flash intensity will help prevent
pictures from appearing too bright or dull.

Depending on what you are shooting,
you will need to selectively adjust the
fl  ash intensity, otherwise you might just
end up burning your overall image. We
do not recommend using the on-camera
fl  ash, as you will only end up spoiling
the overall image. Try making use of the
Bounce Flash method discussed later on
in this workshop. For point-and-shoot
cameras though, the Bounce Flash
method won’t quite work since the fl  ash comes fit with the device. So apart from reducing the fl  ash manually, you can have a white sheet of paper placed in front of the fl  ash to further reduce the fl  ash intensity.
Camera gear
LENSES TO LOOK
OUT FOR WHEN SHOOTING
INDOOR AND OUTDOOR: As far
as point-and-shoot cameras go, you obviously don’t have the choice of choosing the lens, as these cameras come fit with a decent amount of zoom out of the box. There are a few that offer upto 30x optical zoom,
which is more than enough to capture objects that are at quite a distance. Adding to this are the
preset scene modes that make the normal digital point-and-shoot  a jack of all trades. So you get is a  zoom lens, a macro lens and a normal lens all fi  t into one single unit.However, the stock lens that you normally get with a DSLR gives a maximum of just 3x zoom, which isn’t much, especially if outdoor photography
is what you are mostly into. Here, however, you have lenses to take care of
each aspect of photography. There are three types of lenses that generally fi  t a
DSLR - zoom lenses, prime lenses and macro lenses.
ZOOM LENSES: A typical zoom lens
(24 – 90 mm) will give an approximate
zoom range of 3.5x. However, if you want
the best of both worlds, try going in for a
28 – 200 mm zoom lens. That way, you
wouldn’t need to carry an additional lens
when travelling.
PRIME LENSES: Prime lenses, on the
other hand, don’t of  er any kind of zoom.
In other words, these lenses have a fi  xed
focal length. But what they lack in zoom,
they more than make up by delivering
superior image quality. In addition, these
lesnses are lighter and cheaper than traditional zoom lenses. They also have a larger aperture range that is capable of capturing images in low light conditions while maintaining the same shutter speed of a zoom lens. Prime lenses are best used when you require the picture to have a certain depth of fi  eld.
MACRO LENSES:
Macro lenses are best used when you want to capture extreme close up shots of subjects. They are best used to highlight specifi  c parts of a subject while blurring out the rest. However, they require sufficient
lighting to make the overall picture stand out.
TRIPODS:
Tripods are
an essential part of any
photographer’s equipment. So
making use of a tripod when shooting will undoubtedly
produce much better results. There are a few things
that you need to look at before taking the plunge.
First and foremost, you will need to check
the overall weight of the tripod. This
will depend on your requirements. If  you are the kind to
make use of several lenses and camera
fl  ashes, it would be advisable to settle
for a tripod that’s slightly heavy. But if
you are always on the move and all you
have is the camera, you should consider
buying a tripod that’s light and compact
enough to carry. Secondly, check the
tripod for stability as there are a few
that tend to wobble when fi  t with a
camera. The best way to do this would be to mount the camera with the legs of
the tripod spread out. If it feels wobbly or uncomfortable, you should consider looking at something else.
Next, consider the extensibility
of the tripod. Choose something that reaches your height when fully extended.
However, this also depends on what you are trying to shoot. Tripod heads should
also be taken into account i.e.: their ease of use, overall movement of the
camera when attached to the tripod, and if they are easy to detach when the need arises.
So make sure you take all these into account before
purchasing a tripod.If you are not too keen on
purchasing a tripod, you can instead invest in a monopod.
Monopods are much lighter to carry and since they only have a
single leg, they wouldn’t take you more than a few seconds to set
up. They are also considerably cheaper than their three-
legged counterparts. However, keep in mind that a monopod
will not eliminate camera shake as well as a
tripod, but will
to be continued.........

Thursday, March 3, 2011

How To Hack and Crack IDM

Hello Friends, in my previous article we discussed on Sharecash Downloader today i am going to explain how to hack or crack Internet Download Manager (IDM) manually. IDM is the best Internet download manager available on internet but its not free and its cracked or patched versions contains viruses.

 Using this hack you can register the Internet Download Manager (IDM) for free using you own credentials i.e register on your Name and email ID.

 I am explaining the manual hacking method because most of my users said that patch and keygen contain viruses.

This hack also works for trail IDM that means download a trail IDM from there site and register the professional i.e. full version of IDM with your credentials for free using my hack.


Hack or crack IDM manually :

Step 1: Download the IDM trial or If you already have IDM installed Update it by going to Help---}} then to check for Updates.If you don't wanna update your version, Just click on Registration.

Step2: When you click on registration, Now a new dialog(window) appears that is asking for Name, Last Name, Email Address and Serial Key.

Step3: Now Enter you name, last name, email address and in field of Serial Key enter any of the following Keys:

RLDGN-OV9WU-5W589-6VZH1
HUDWE-UO689-6D27B-YM28M
UK3DV-E0MNW-MLQYX-GENA1
398ND-QNAGY-CMMZU-ZPI39
GZLJY-X50S3-0S20D-NFRF9
W3J5U-8U66N-D0B9M-54SLM
EC0Q6-QN7UH-5S3JB-YZMEK
UVQW0-X54FE-QW35Q-SNZF5
FJJTJ-J0FLF-QCVBK-A287M

And click on ok to register.

Step4: After you click ok, it will show an error message that you have registered IDM using fake serial key and IDM will exit. Now here the hack starts.

Step5: Now Go to START => Then go to RUN and type the following text and click enter:

notepad %windir%\system32\drivers\etc\hosts

Note : For Windows 7 users, due to security reasons you will not be able to save hosts file.
so follow this steps :
First of all go to C:/ drive then go to Windows Folder and then go to System32 folder and then go to Drivers folder and then go to Etc Folder, in the Etc folder you will see the hosts file.


Step6: Now right click on hosts file and go to its properties, then go to security tab and then select your admin account, just below u will see an edit button (in front of change permissions), Now give the user full control and write and read rights and then click on apply and then click on Ok, now u will be able to edit the hosts file and save changes in it.

Step7: Now a notepad file appears something like this as shown below:


Now copy the below lines of code and add to hosts file as shown above image box :

127.0.0.1 tonec.com
127.0.0.1 www.tonec.com
127.0.0.1 registeridm.com
127.0.0.1 www.registeridm.com
127.0.0.1 secure.registeridm.com
127.0.0.1 internetdownloadmanager.com
127.0.0.1 www.internetdownloadmanager.com
127.0.0.1 secure.internetdownloadmanager.com
127.0.0.1 mirror.internetdownloadmanager.com
127.0.0.1 mirror2.internetdownloadmanager.com

After adding these piece of code, save the notepad file. And exit from there.

Now start your Internet download manager, and now you IDM has been converted to full version and specially when you update next time, your registration will not expire.

That means it will remain full version for life time and you can update it without any problem in future.

 proof of Successfully Hacking IDM:


I hope you are now able to convert your Trial version of IDM into Full Version. If you have any problem in this tutorial on
How To Hack and Crack IDM,
please mention it in comments.Enjoy .........

Saturday, February 19, 2011

Build Your Own File Server

Build Your Own
File Server

Build yourself a secure file server using any old
computer with a couple of hard drives and store
all your data centrally

Every oi   ce that generates large amounts of data needs a fi  le server so that users can access
it all from a central location. The sole purpose of a fi  le server is to provide the users on the network with fi  les. Additionally, fi  le servers can also provide data to other users over the internet via a website or FTP service. A fi  le server is nothing but a simple computer with ample storage space, running a server operating system and confi  gured with data backup or synchronizing software. The hardware is usually designed using special purpose processors, RAM, motherboards, hard drives, power supply units and cabinets so the server is able to be powered on 24x7. So they have to be rugged and ei   ciently cooled too.The main component of a server is the storage space, but using a single spacious hard drive will not serve the purpose. The drives should also be highly ei   cient in terms of speed, should have a large volume, and last but not the least, they should be secure enough to keep your data safe. Hence, they are usually onfi  gured in RAID, where multiple hard drives are deployed to ensure speed and safety during data transfers. Hard drives can be confi  gured in RAID using dif  erent modes— RAID 0, 1, 5, 10 or 01. While RAID 0 is considered the fastest as it uses the
data striping feature, RAID 1 is the safest as it uses data mirroring. but both have their advantages and disadvantages. RAID 5, 10 and 01 are combinations, which uses both striping and mirroring to form fast and safe storage. We will show you how to confi  gure a simple fi  le server which uses RAID 0 or RAID 1 using two SATA hard drives and an old computer. You can also use multiple hard drives to form a RAID 5, 10 or 01 volume.Note: To create a RAID volume, the hard drives must be of the same type, speed and capacity, otherwise the one with the lesser of these features will bring down the ei   ciency of the entire group. A file server is usually untouched, except for maintenance such as application installation, user confi  guration or fi  xing breakdowns. You can build your
own server and leave it behind a desk, in a loft or hidden inside a cabinet, but the place it's set up in should be spacious, well ventilated and easily accessible for maintenance. The monitor, keyboard
and mouse can be disconnected until required. 
Requirements
Any old desktop computer. A Pentium  
4 or higher is preferable.
Two or more similar SATA hard drives. 
2 GB RAM should be enough, unless  
you have more to spare.
A PCI SATA RAID card, unless your  
motherboard features built-in RAID.
An operating system. A server edition  
is highly recommended if there are many users accessing it. Let’s begin. Open and clean the old computer thoroughly and ensure a dust-free interior for ei   cient cooling. Install a PCI SATA RAID card into a vacant PCI expansion slot and screw it in place, unless your motherboard features an onboard RAID controller. Install the two (or more) hard drives in the respective
bays and connect the necessary cables (data and power). Confi  rm that all cables
are neatly tied and tucked away from the cooling fans and ducts to ensure proper air circulation. Oncedone, your hardware is ready to become a server.Now is the time to install the operating
system, but before this, you will need to confi  gure the hard drives in RAID. If your
motherboard features RAID, then simply go to the BIOS setup and confi  gure the
two hard drives in RAID 0 or 1 and exit. If you are using a PCI RAID card, then
you will have to press the necessary keys displayed on the screen while the system
is starting up to enter the card’s BIOS. Here again, confi  gure the hard drives in
RAID and save the settings. You’re fi  nally done confi  guring the hardware. If you
want a secure storage system, use the RAID 1 confi  guration, and if speed is the requirement, go for RAID 0. Note: Hard drives in RAID 0 will allow the total combined capacity to be used
while RAID 1 of  ers half the combined storage space. For Example: RAID 0: 80 GB + 80 GB = 160 GB and RAID 1: 80 GB + 80 GB = 80 GB. 
Procedure
Begin installing the operating system. You can use a Microsoft Windows Server Edition OS (recommended) or a Linux OS. We have used Windows XP as the OS as an old computer would already have a licensed operating system. During the installation, you might be prompted to install the drivers for the RAID hardware so that the OS can recognize the storage/volume type. Insert the driver CD that came with the motherboard or the PCI RAID card. The setup will then detect
the storage space and you can continue installing the operating system as usual.
Your fi  le server is now fi  nally ready to be confi  gured. Once the OS is installed,
make sure you have installed all the drivers and created all the users and their
profiles as per the requirement of your network. Copy your data to the storage
drives and share the respective folders with appropriate user rights. That’s it!
Your file server is ready to be deployed. Just connect the server to the network
after configuring the network card and then disconnect the monitor, keyboard and mouse.
Now that your server is on duty, there are some things that you should
also consider. Use a UPS to avoid data loss during power failures, install an
exhaust fan in case you are keeping it in an enclosed area, install an antivirus software for additional security, install and keep running a password protected virtual networking software so that you can access the server from another computer on the network instead of
connecting a monitor and input device and operating the server. Additionally, we also recommend a few changes to your server hardware. Since you are using an older computer, replacing the power supply unit would be a good idea as this component might fail when used 24x7.
Additionally, to lower the noise of multiple hard drives spinning inside the cabinet,
design some foam or rubber sleeves for the hard drives to dampen the vibrations.
Finally, use the power saving and/or WOL feature of the motherboard to power down the hard drives or system when the server is not being used. This will not only save power, but will also prolong the life of the server’s hardware. Your fi  le server is finally ready for action. Let it serve you betterNow that your fi  le server is ready and serving its purpose on the network, why not use the entire eficiency of the server for other purposes to enhance your business productivity or home
convenience. As we mentioned earlier, fi  le servers are nothing but simple computers,
and you can use them for multiple purposes apart from simply sharing a folder or drive. Some other applications that can be installed on the server to juice-out some additional functionality.
Media server:  Install a media server application and store your complete collection of audio and
video fi  les on the server and stream them to all the computers or handheld gadgets from a centrally
located location. Examples: iTunes, IceCast, Unreal
HTTP server: Host your own website from home or
oi   ce using an
HTTP server.
All you need is a live IP address from
your internet service provider. You don’t
need to worry about web space because
your server’s storage space is the limit.
Website down time is zeroed as your
server would be online all the time in your
own premises. Finally, hosting charges
are nil as you own the server. Examples:
Apache HTTP server, Xerver.
FTP server: Allow your friends and

clients to access your
data fi  les or upload their
data to your server using
the FTP service. Here
too you would require a
live IP address from your ISP. Examples:
Xerver, FileZilla, Xlight, WinFTP.
Printer server:  Install printer(s) on
the file server and share them across the
network. You don’t need to worry about
the printers connected to client machines
on the network being shut down. All your
printers can be in one location at home
or oi   ce.
Database servers: Centrally feed
in all your data and share it w ith a
database management software to
make information available to all users
on the network. Examples: SQL, Oracle,
Microsoft Access, FileMaker.
Accounting server: Similar to a
database server, multi-user accounting
server applications can be installed to
provide multi-user access to accountants
on the network. Examples: Tally, Busy.
 Proxy server:
Proxy servers
help internet
usage on the
local network
work much faster
because of their caching feature. You
can create user profi  les to induce profi  les
to authenticate users or even block
particular websites. Examples: FreeProxy,
AnalogX, CCProxy.
Download server: Employ the server to be a single point for downloading fi  les and torrents from the Internet. This is benefi  cial as the server can be used for
managing all your data downloads by taking the benefi  ts of its 24-hour uptime. Examples: DAP, FlashGet, uTorrent, BitComet.Backup server:  Install backup or
synchronizing software on the server and confi  gure it in such a way that it can automatically backup crucial data from all the machines on the local network at specifc intervals. This would ensure that,
apart from client machines, a copy of all your data exists on the server. Example:
Fbackup, AceBackup.Mail server: Mail servers can be very
beneficial on a local network. Users can send and receive mails to the fi  le
server, which will do the job of sendingemails outside or collecting emails and
distributing emails from an online POP server to local users. Also send emails
internally without the need of using Internet bandwidth. Example: hMailServer,
netMailshar, Winmail, CMailServerSecurity monitor: Using a video
security monitoring software, your fi  le
server can also act as a surveillance unit by recording video feeds from webcams
and IP cameras. Example: WebcamXP,
SmarterGuard Basic.


click on image for full size
Safety first
Data on a fi  le server is important and 
should be kept safe and secure at all
times. Backing up the server frequently is
a must as you would need to keep your
data safe in extreme cases such as virus
attacks, hard drive errors, bad sectors,
accidental wipeouts, etc. Keeping your
data safe means you should replicate
your data from the server onto another
machine or external storage medium from
time to time.
In case of a server crash or hardware
failure, your data on the fi  le server can
be lost. The only form of backing up
your server is mirroring or synchronizing
your data completely to another external storage or machine. Numerous
applications such as GoodSync, Vice Versa and such are available online
which can help synchronize your data to have a secure backup system. We
will use SyncBackSE as an example for synchronizing/mirroring software. You can download a 30-day trial from ‘www.2brightsparks.com’ and if you would like to buy it, the utility is available
for $30 (approx Rs 1,500) onwards. SyncBackSE is a powerful utility that
helps automatically copy fi  les and folders from a defi  ned location to another, be it
on the local drives, NAS, external storage drives, or even FTP servers.
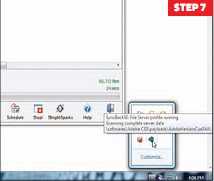
Install and start the application and click on ‘Profiles | New’. Enter a name
to diferentiate between profiles if you are creating multiple profi  les, and click
‘Next’. In the following screen, click on the type of synchronization from ‘Backup’,
‘Synchronize’, ‘Mirror’, or Group’. Mirroring is useful as fi  le servers need
to be replicated to save space and create an exact folder structure as the original
ones in case of a system crash. You can opt for synchronize or backup if you wish
to keep copies of older deleted data too,but the destination disk space might fall
short over time. In the next screen, you can choose to backup/sync from or to an FTP server.
If you don’t have any, skip this screen. Now enter a description name for the
source fi  les and select the source folder and click ‘Next’. Do the same for the destination folder at the next screen.
Now define your preferred method and period of the mirroring of data. Click on
‘When’ from the left panel and then on Edit Schedule’ and the utility will ask you
to enter your current user password for security. Enter the details and adjust the
date and time along with the period of recurrence according to your choice of
mirroring. Ideally, a recurring period of one hour, daily, should be ideal in case
your server’s data is updated at regular intervals.
If you are sure that your server data changes after longer periods, you can
change the profi  le to run every two or seven days. Now that the profi  le
is completely ready, you can activate it and it will run automatically in
the background at the specifi  ed time intervals. Similarly, you can create
multiple profi  les to have a safer backup by defining dif  erent folders or data
specific folders to diferent backup
locations. Mirroring the data from your file server automatically is essential via an
automated backup or synchronizing utility so that you do not have to waste
time performing these essential chores manually each day or every week.

Tuesday, February 8, 2011

Extreme Overclocking: Getting Your Celeron to Run at 8.20 GHz


Disappointed at the slow speeds of your old Intel processor? An overclocker at XtremeLabs.org reports getting the clock speed of a 3.06GHz Celeron processor up to a blistering 8.20GHz, setting a new world record in the process.
The forum post at XtremeLabs (in Russian) shows how an overclocker with the moniker of "TiN" went about speeding up this chip: TiN heated the processor so that it separated from the integrated heat spreader and could then be placed into a modded DFI Lanparty UT P35-T2R motherboard. TiN then cooled the whole setup with liquid nitrogen to keep the chip from achieving combustion.

The overclocking setup. Image credit: TiN on XtremeLabs.org
Faster than the previous world record by 16.8MHz, this overclock of almost three times the original speed managed to run without melting the processor. Despite the detailed post and photos, TiN didn't show any benchmarks for the Celeron, so we won't know how it does against newer members of the Intel lineup until TiN demonstrates the capabilities of the 8.20 GHz processor.
Even if the hacked Celeron falls short of the performance of more recent chips, this remains an impressive feat: TiN, my hat's off to you!
[Via Hexus and Tom's Hardware.]

BIOS Beep Error Codes

After repeated requests for beep codes i have decided to post them here maybe they could be pinned

Standard Original IBM POST Error Codes
Code Description

1 short beep System is OK
2 short beeps POST Error - error code shown on screen No beep Power supply or system board problem Continuous beep Power supply, system board, or keyboard problem Repeating short beeps Power supply or system board problem
1 long, 1 short beep System board problem
1 long, 2 short beeps Display adapter problem (MDA, CGA)
1 long, 3 short beeps Display adapter problem (EGA)
3 long beeps 3270 keyboard card
IBM POST Diagnostic Code Descriptions
Code Description
100 - 199 System Board
200 - 299 Memory
300 - 399 Keyboard
400 - 499 Monochrome Display
500 - 599 Colour/Graphics Display
600 - 699 Floppy-disk drive and/or Adapter
700 - 799 Math Coprocessor
900 - 999 Parallel Printer Port
1000 - 1099 Alternate Printer Adapter
1100 - 1299 Asynchronous Communication Device, Adapter, or Port
1300 - 1399 Game Port
1400 - 1499 Colour/Graphics Printer
1500 - 1599 Synchronous Communication Device, Adapter, or Port
1700 - 1799 Hard Drive and/or Adapter
1800 - 1899 Expansion Unit (XT)
2000 - 2199 Bisynchronous Communication Adapter
2400 - 2599 EGA system-board Video (MCA)
3000 - 3199 LAN Adapter
4800 - 4999 Internal Modem
7000 - 7099 Phoenix BIOS Chips
7300 - 7399 3.5" Disk Drive
8900 - 8999 MIDI Adapter
11200 - 11299 SCSI Adapter
21000 - 21099 SCSI Fixed Disk and Controller
21500 - 21599 SCSI CD-ROM System

AMI BIOS Beep Codes
Code Description

1 Short Beep System OK
2 Short Beeps Parity error in the first 64 KB of memory
3 Short Beeps Memory failure in the first 64 KB
4 Short Beeps Memory failure in the first 64 KB Operational of memory
or Timer 1 on the motherboard is not functioning
5 Short Beeps The CPU on the motherboard generated an error
6 Short Beeps The keyboard controller may be bad. The BIOS cannot switch to protected mode
7 Short Beeps The CPU generated an exception interrupt
8 Short Beeps The system video adapter is either missing, or its memory is faulty
9 Short Beeps The ROM checksum value does not match the value encoded in the BIOS
10 Short Beeps The shutdown register for CMOS RAM failed
11 Short Beeps The external cache is faulty
1 Long, 3 Short Beeps Memory Problems
1 Long, 8 Short Beeps Video Card Problems

Phoenix BIOS Beep Codes
Note - Phoenix BIOS emits three sets of beeps, separated by a brief pause.

Code Description
1-1-3 CMOS read/write failure
1-1-4 ROM BIOS checksum error
1-2-1 Programmable interval timer failure
1-2-2 DMA initialisation failure
1-2-3 DMA page register read/write failure
1-3-1 RAM refresh verification failure
1-3-3 First 64k RAM chip or data line failure
1-3-4 First 64k RAM odd/even logic failure
1-4-1 Address line failure first 64k RAM
1-4-2 Parity failure first 64k RAM
2-_-_ Faulty Memory
3-1-_ Faulty Motherboard
3-2-4 Keyboard controller Test failure
3-3-4 Screen initialisation failure
3-4-1 Screen retrace test failure
3-4-2 Search for video ROM in progress
4-2-1 Timer tick interrupt in progress or failure
4-2-2 Shutdown test in progress or failure
4-2-3 Gate A20 failure
4-2-4 Unexpected interrupt in protected mode
4-3-1 RAM test in progress or failure>ffffh
4-3-2 Faulty Motherboard
4-3-3 Interval timer channel 2 test or failure
4-3-4 Time of Day clock test failure
4-4-1 Serial port test or failure
4-4-2 Parallel port test or failure
4-4-3 Math coprocessor test or failure
Low 1-1-2 System Board select failure
Low 1-1-3 Extended CMOS RAM failure

Boot Block Recovery For Free

You don't need to pay a measly sum of dollars just to recover from a boot block mode. Here it is folks:

AWARD Bootblock recovery:

That shorting trick should work if the boot block code is not corrupted, and it should not be if /sb switch is used when flashing the bios (instead of /wb switch).

The 2 pins to short to force a checksum error varies from chip to chip. But these are usually the highest-numbered address pins (A10 and above).

These are the pins used by the system to read the System BIOS (original.bin for award v6), calculate the ROM checksum and see if it's valid before decompressing it into memory, and subsequently allow Bootblock POST to pass control over to the System BIOS.


You just have to fool the system into believing that the System BIOS is corrupt. This you do by giving your system a hard time reading the System BIOS by shorting the 2 high address pins. And when it could not read the System BIOS properly, ROM Checksum Error is detected "so to speak" and Bootblock recovery is activated.

Sometimes, any combination of the high address pins won't work to force a checksum error in some chips, like my Winbond W49F002U. But shorting the #WE pin with the highest-numbered address pin (A17) worked for this chip. You just have to be experimentative if you're not comfortable with "hot flashing" or "replacement BIOS".

But to avoid further damage to your chip if you're not sure which are the correct pins to short, measure the potential between the 2 pins by a voltmeter while the system is on. If the voltage reading is zero (or no potential at all), it is safe to short these pins.

But do not short the pins while the system is on. Instead, power down then do the short, then power up while still shorting. And as soon as you hear 3 beeps (1 long, 2 short), remove the short at once so that automatic reflashing from Drive A can proceed without errors (assuming you had autoexec.bat in it).

About how to do the shorting, the tip of a screwdriver would do. But with such minute pins on the PLCC chip, I'm pretty comfortable doing it with the tip of my multi-tester or voltmeter probe. Short the pins at the point where they come out of the chip.


AMIBIOS Recovery bootblock:

  • Copy a known working BIOS image for your board to a floppy and rename it to AMIBOOT.ROM.
  • Insert the floppy in your system's floppydrive.
  • Power on the system while holding CTRL+Home keys. Release the keys when you hear a beep and/or see the floppy light coming on.
  • Just wait until you hear 4 beeps. When 4 beeps are heard the reprogramming of the System Block BIOS went succesfull, so then you may restart your system.
Some alternative keys that can be used to force BIOS update (only the System Block will be updated so it's quite safe):
  • CTRL+Home= restore missing code into system block and clear CMOS when programming went ok.
  • CTRL+Page Up= restore missing code into system block and clear CMOS or DMI when programming went ok.
  • CTRL+Page Down= restore missing code into system block and do not clear CMOS and DMI area when programming went ok.
Btw: the alternative keys work only with AMIBIOS 7 or higher (so for example an AMI 6.26 BIOS can be only recovered by using CTRL+Home keys).

Recovering a Corrupt AMI BIOS chip

With motherboards that use BOOT BLOCK BIOS it is possible to recover a corrupted BIOS because the BOOT BLOCK section of the BIOS, which is responsible for booting the computer remains unmodified.

When an AMI BIOS becomes corrupt the system will appear to start, but nothing will appear on the screen, the floppy drive light will come on and the system will access the floppy drive repeatedly. If your motherboard has an ISA slot and you have an old ISA video card lying around, put the ISA video card in your system and connect the monitor.

The BOOT BLOCK section of the BIOS only supports ISA video cards, so if you do not have an ISA video card or your motherboard does not have ISA slots, you will have to restore your BIOS blind, with no monitor to show you what’s going on.


AMI has integrated a recovery routine into the BOOT BLOCK of the BIOS, which in the event the BIOS becomes corrupt can be used to restore the BIOS to a working state.

The routine is called when the SYSTEM BLOCK of the BIOS is empty. The restore routine will access the floppy drive looking for a BIOS file names AMIBOOT.ROM, this is why the floppy drive light comes on and the drive spins.

If the file is found it is loaded into the SYSTEM BLOCK of the BIOS to replace the missing information. To restore your BIOS simply copy a working BIOS file to a floppy diskette and rename it AMIBOOT.ROM, then insert it into the computer while the power is on.

The diskette does not need to be bootable or contain a flash utility. After about four minutes the system will beep four times. Remove the floppy diskette from the drive and reboot the computer. The BIOS should now be restored.


Recovering a Corrupt AWARD BIOS
With AWARD BIOS the process is similar but still a bit different. To recover an AWARD BIOS you will need to create a floppy diskette with a working BIOS file in .BIN format, an AWARD flash utility and an AUTOEXEC.BAT file. AWARD BIOS will not automatically restore the BIOS information to the SYSTEM BLOCK for this reason you will need to add the commands necessary to flash the BIOS in the AUTOEXEC.BAT file.

The system will run the AUTOEXE.BAT file, which will in turn flash the BIOS. This is fairly easy. Here are the steps you need to take.


· Create a bootable floppy diskette
· Copy the BIOS file and flash utility to the diskette
· Create an text file with any standard text editor and add the following lines

@ECHO OFF
FLASH763 BIOSFILE.BIN /py

In the above example I am assuming that you are using the FLASH763.EXE flash utility. You will need to replace the FLASH763 with the name of whatever flash utility you are using, and replace the BIOSFILE.BIN with the name of the BIOS file you are using.

You will also need to change the ‘/py’ to whatever the command is for your flash utility to automatically program the BIOS without user intervention. If you do not know the command to automatically flash your BIOS type the name of the flash utility with a space and then /? to display the utility’s help
Publish Postscreen.

The help screen should pecify the command switch to automatically flash your BIOS. If you are using the FLASH763.EXE utility then the switch to automatically flash your BIOS is ‘/py’.

Make Windows XP Look and Feel like Windows 7


Make Windows XP Look and Feel like Windows 7

For all those who don’t want leave their good old XP there are plenty of 3rd party software to get the best feature of Windows 7 in XP.
Before you get started, create a system restore point, just in case some applications starts acting little funny. For this, go to Start>All Programs>Accessories>System Tools>System Restore to create one.

Adding the Superbar
The Superbar like Windows 7 minimizes the space taken by each application by displaying only icon in taskbar and grouping similar instances of an application as one. You can click on the icon to choose the instances you want to open (Just click on the thumbnail to open it).
  A small program named ViGlance doesn’t require an installation. Just run the software (And choose between a few options) and you’re done. Right click on the notification icon click options to select animations and other effects. You can pin items that might be open so that their link stays on the taskbar.  You can Download it on http://www.lee-soft.com/viglance

Splitting Windows and AeroPeek
With Windows 7 comes a new set of shortcuts to arrange your open windows. You can “snap” open windows to different edges of your screen, which is helpful if you quickly want to divide the screen into two separate halves. This is done with the Windows + Left or Right keys. Pressing Windows + space bar on the other hand, displays the desktop by making all applications transparent. There are several applications that allow you to get same functionality in Windows XP, but I would recommend Windows Split. With its range of options the application is a delight for any power user. Install the software and check the list of Shortcuts available. Also, it allows you to customize each (Layout Settings) so can enjoy as much as flexibility as you want to. Download this application at http://www.winsplit-revolution.com/download

Shaking off all inactive windows using AeroShake
AeroShake feature of Windows 7 is simple. Shake the active window and it hides all other windows. Shake it again and the windows are back to where they were. AeroShake software does the same for Windows XP. Download it from http://cache.gawker.com/assets/images/gawker/2008/11/Aero_Shake_1.3.exe         

Skinning your Windows
·        Windows 7 Complete by DopeySneezy. A complete theme replacement, with a replacement utility to allow you to backup all the system files you need to change. But replacing is manual, so a little time consuming. Get it from http://dopeysneezy.deviantart.com/art/Windows-7-complete-109505907
·        Seven VG Theme by Vishal Gupta: A very popular theme by Vishal Gupta, who also run a blog with a lot of other tweaks for Windows users (http://www.askvg.com). Different parts of the themes are available as setups, which make it easier to install. http://www.deviantart.com/download/106952053/SevenVG_Refresh_with_Superbar_by_Vishal_Gupta.zip
·        CAD 2009 EDITION v1.5 by Flawless: for getting the Ctrl+Alt+Del screen in Windows 7 style, download this application at http://flawless02.deviantart.com/art/CAD-2009-EDITION-v1-5-for-XP-132794740 

10 top tips that will help you to increase your Disk Space…

10 top tips that will help you to increase your Disk Space…


1.      Monitor your file space: There are lots of tools that can tell you which files and folders consume the most space on your computer and where they are located. Armed with this information, you can decide what to get rid of. There of the best are JDisk Report (www.jgoodies.com), WinDirStat (http://winddirstat.info) and Disktective (www.disktective.com). All are free to download and display their findings in a clear, easy-to-understand manner.

2.      Run Disk Cleanup
An obvious tool to try when your hard disk is running short of space is Windows’ built-in Disk Cleanup. The program will calculate how much disk space you can free up. Wait until the ‘files to delete’ list appears, then select every item and click OK. There’s nothing here that you can’t live without and you can reclaim a surprising amount.

3.      Empty the Recycle Bin
Deleted files can occupy many gigabytes of disk space without you realizing. To stop them accumulating and taking up valuable room, first right-click the Recycle Bin on your Desktop and select the Empty option to delete the Bin’s contents. Right click it again and this time select Properties, Reduce the space allocated to the Recycle Bin to 1GB and click OK to confirm.

4.      Compress your files
Windows can compress files on your hard disk to reduce the amount space require. Right-click a file and choose Properties, then click the Advanced button and select the option to ‘Compress contents to save disk space’. Click OK and OK again. This trick works even better when you right-click a folder as you’ll be prompted to apply compression to all its files and subfolders. Go ahead – it won’t adversely affect their contents. Personally I also use it.

5.      Zip files up
If there are files that you don’t use regularly, you can zip them up. Compressing them in this way can, with certain files, save more than 50 per cent of the original space they used. Right-click a file or folder and select Send To, then ‘Compressed (zipped) Folder’. Delete the original afterwards.  
6.      Remove optional components
Getting rid of Windows components that you don’t use helps to reclaim disk space. In XP, click Start>All Programs>Accessories>System Tools>Disk Cleanup. When the Disk Cleanup window appears, click the More Options tab and then select Clean Up in the Windows Components section. Some entries contain multiple items, such as Accessories and Utilities, so select them and click the Details button to choose the items you want to keep or remove. You can restore components from your installation disc (if you have one) if you later decide you need them.

7.      Limit System Restore
System Restore lets you undo changes that have been made to Windows, such as when you install new software or hardware. It’s a worth reducing the amount of space allocated to System Restore. In XP, click Start>Right-click My Computer and select Properties. Click the System Restore tab and then drag the slider bar to the left to reduce the disk space usage. Set the slider to 1000MB, which is a good compromise between necessary back-ups and the amount of space used.
   In Vista, click Start, right-click Computer and select Properties. Click System Protection and clear the tick against the relevant disk drive. Click Apply and then OK, but note first that this removes all restore points (backups), so you should only proceed if your PC is working well. Click system Protection again but this time tick the box next to the disk drive. The space used by System Restore will now be considerably reduced. 

8.      Limit IE’s cache
Internet Explorer can use up to 1GB of disk space to store recently accessed web pages. To stop these from building up in the browser’s cache, click Tools and choose Internet Options>Click the Settings button in the ‘Browsing history’ section of the General tab and set the disk to use to 50.

9.      Uninstall software
Old software that you no longer use can consume lots of space. Open ‘Add or Remove Programs’ in the Control Panel (XP) or ‘Programs and Features’ (Vista & 7), and choose the option to sort installed programs by size. This will help you identify the biggest space hogs. You can then uninstall any greedy programs that you don’t need anymore.

10.    Use online storage
Microsoft’s Windows Live SkyDrive service (http://skydrive.live.com) provides 5GB of free online storage space for documents, music, photos and videos. Sign up and upload seldom-used files from your hard disk and you’ll have up to 5GB more space to play with. There are many equally good free alternatives, including Adrive (www.adrive.com) and Humyo (www.humyo.com).

  You can use Cloud OS’s for online storage like Glide OS (10GB of free online storage) or G.ho.st (15GB of free storage

How To Fix a Corrupted Memory Card

Hi Guys, Most of us face a common problem when we use memory cards that is nothing but corrupted memory!! error. so we usually try to fix it and it will not be possible all times. So we go and buy a new one. Before trying to buy a new one just follow some trouble shooting steps and in most of the cases it will be unsuccessful but some times it will be fixed. I have a personal experience of recovering a corrupted memory card of one of my friend and was successful 

All you have to do is see whether you are able to see the memory card is detected by the systrem or not when we connect with the help of data cable via mobile or a simple card reader. IF it is detecting then do follow the simple steps below.

1) After connecting the mmc to system just check out which drive is holding the memory card and right click on the drive where your memory card is there and click on properties.
2) Now click on Format and when the pop up box appears just click on file system as FAT and memory cards support only FAT but not FAT32 or NTFS.
3) Now click on start but don’t check quick format. Just leave it blank.
4) Now check whether your memory card is working or not. If not then follow these few more steps.
5) Open RUN by pressing Ctrl+R and type CMD and then press enter.
6) Now if the memory card drive is L: then type L: and press enter.
7) Now type as format L: and press enter.
  Its asks for conformation and asks to press y or n just type y and wait until it finishes.
9) This will create default clusters in mmc and Mostly this will fix the memory card.
10) Its also a good option to try to format the memory card in mobile itself.


In-spite of all of these steps if your memory card is not working??? then you can download a simple simple application which will try to fix the memory card. Just download the software below and you can also visit these guys for more info you can find more info in there site : VISIT HERE and the software’s are all available in demos so u can fix or recover the data free.

Transform your Windows XP in to Windows 7 in just few minutes

 The Microsoft Release Candidate is already out and free to download. But still if you are one of those XP lovers like me who can’t stop using XP then you can try the Windows 7 kinda look for your XP.
After writing many posts about windows 7 look for XP such as Windows 7 boot screen for XP , Windows 7 welcome screen for XP and Windows 7 theme for XP users today I finally found all in one Windows XP to Windows 7 transformation pack.By using which even a newbie can get the complete Windows 7 look without doing any extra work. It is as simple as installing a new software on your PC


Windows 7 trasformation pack
With Windows 7 remix you can make your XP look like Windows 7 in just few clicks. It supports Windows XP, Windows 2003, Windows Media Center Edition and some other flavors of XP.
Languages:
  • Spanish
  • English
Will work with only 32 bit edition of Windows.

Download Windows seven Remix(31 MB)

How to optimize the Windows performance

How to optimize the Windows performance by removing unwanted programs from startup using windows registry. Applicable to Windows XP, Vista, Windows 2000, windows 98 and windows server. Most of us face this problem of computer slowing down; windows operating system takes ages to load when started, windows explorer hangs up and also how to find out whether your computer is infected.
Follow these steps:
1. Start and click on run in case of windows XP, Server, windows 98, a
nd 2000 but in vista type directly in search box
2. Type Regedit in the run box to open registry editor
3. Go to file menu and click on export to create a back up of registry,
save it on your drive other than your default windows directory.
Find out the current programs which are starting up with windows
After opening Registry editor click on HKEY_LOCAL_MACHINE
Software\
Microsoft\
Windows\
Current Version\
Run
You will see something like this on right hand pane in your registry editor
4.Now it’s time to get rid of the programs those slow down your operating system
and possible may be a Trojan horse hiding in your hard disk.
Right click on any program to delete the entry, which you don’t want
to be loaded during startup; personally I would only keep anti virus program entries.
Now you can repeat the same process with HKEY_LOCAL_USER entries
and keep only Cftmon.exe for your computer sound to be working
After deleting the unwanted program registry entries,
restart the system and feel the difference in speed.
If you are confused about which entries to be deleted from
registry editor or want to know whether it’s a Trojan or useful
program, you can write to me at harmohindersingh@rocketmail.com

How to improve your RAM without any programs in Win 7

Hi Friends i am going to show you a trick which improves your RAM performance in windows 7. the best part of this trick is that you dont need to install any programs for improve the speed of your RAM. I will show you the procedure in simple steps.
Step 1: Create a New Text Document on the Desktop with Notepad. Open it and copy the above code and paste in it. “ mystring=(80000000) “ and save the changes and close it.
Step 2: Activate showing the file extension option in folder options. To go to folder options click on organise –> choose folder and search options –> it will open a window for the folder options –> click on view tab –> uncheck hide extensions for unknown file types.

Step 3: Now, Go to the created text file on the desktop and rename it to “ ram.vbe “ you can see the shape and icon of the file is changed.

Step 4: Now cut the ram.vbe file and paste in the startup Folder. Now  open start menu > click on All Programs > right click on startup icon and choose open cut ram.vbe file in it
S

 Step 5: Now check whether the ram.vbe file in startup or not. Confirm it by tying MSCONFIG in start menu and see whether ram.vbe file is checked in the list.

Now you are done. I hope it will help yoy to improve the speed of the windows 7. thank you. please do comment on the post.